C# 印刷機能(Microsoft Print to PDF)を使ってC#から画像をPDF化する
画像をPDF化する方法を調べていたところ印刷機能(Microsoft Print to PDF)からPDFを作成する機能を見つけたのでこれをC#から呼び出しbat処理するためにC#で呼び出すサンプルです。 以下のサンプルではディレクトリを指定した場合は含まれる画像ファイルをまとめてPDF化します。
using System.Drawing;
using System.IO;

// ※プリンタAPIを使うには System.Drawing.Commonを参照に追加する必要がある
using System.Drawing.Printing;
using System.Linq;

namespace Print
{
    internal class Program
    {
        public static void Main(string[] args)
        {
           // Image.FromFileが処理できる形式のみ対応
            string[] extensions =
            {
                "BMP",
                "GIF",
                "JPG",
                "JPEG",
                "PNG",
            };

            // コマンドライン引数を処理
            foreach (var filepath in args)
            {
                var output = $"{Path.GetFileNameWithoutExtension(filepath)}.pdf";
                var directory = Directory.GetParent(filepath).FullName;

                if (Directory.Exists(filepath))
                {
                    PrintImages(directory, output, Directory
                        .EnumerateFiles(filepath, "*.*", SearchOption.AllDirectories)
                        .Where(x => extensions.Any(y => x.ToUpper().EndsWith(y)))
                        .ToArray());
                }
                else if (extensions.Any(x => filepath.ToUpper().EndsWith(x)))
                {
                    PrintImages(directory, output, filepath);
                }
            }
        }

        private static void PrintImages(string outputDir, string outputFileName, params string[] files)
        {
            PrintDocument doc = new PrintDocument()
            {
                PrinterSettings = new PrinterSettings()
                {
                    // Windows10 から利用可能
                    PrinterName = "Microsoft Print to PDF",
                    MaximumPage = files.Length,
                    ToPage = files.Length,

                    // 縦向き印刷
                    DefaultPageSettings =
                    {
                        Landscape = false,
                    },

                    //出力先をfileに指定する
                    PrintToFile = true,
                    PrintFileName = Path.Combine(outputDir, outputFileName + ".pdf"),
                }
            };

            // サイズはA4
            doc.DefaultPageSettings.PaperSize = doc.PrinterSettings.PaperSizes.OfType<PaperSize>().First(x => x.Kind == PaperKind.A4);

            // 余白無し
            doc.DefaultPageSettings.Margins = new Margins(0,0,0,0);

            int currentPageIndex = 0;
            doc.PrintPage += (s, e) =>
            {
                // 画像をページに描き込む
                using (var image = Image.FromFile(files[currentPageIndex]))
                {
                    e.Graphics.DrawImage(image,e.MarginBounds);
                }

               // 次の画像があるか判定し印刷の続行 / 停止を判断する
                currentPageIndex++;
                if (currentPageIndex >= files.Length)
                    e.HasMorePages = false;
                else
                    e.HasMorePages = true;
            };

            doc.Print();
        }
    }
}
WPF DataTemplate.DataType にinterface を指定可能にするDataTemplateSelectorの実装
やりたいこと
ListViewやItemsControlでデータを並べる際に interface にってViewを切り替えたい。
ItemsControlのDataTemplate解決の仕組み
ListVIewやItemsControlが並べるデータのViewを指定する仕組みについて簡単に解説します。
ItemsControlではItemsSourceに含まれるデータの型によってViewを選択します。
型が指定されており、Keyが指定されていないResourceが対象となります。(<DataTemaplte TargetType = "{x:type hoge}">みたいなやつ)
ItemsControlなどではデータ型に一致するDataTemplateを検索します。この検索では基底クラスの検索も含みます。検索順はVisualTreeを上方向に辿って行って最終的にはApplication.Resourceの中まで検索します。
検索が失敗し見つからなかった場合は DataのToString()を画面上に表示させます。
今回の実装アプローチ
ItemsControlのDetaTemplateを解決する仕組みに乗っ取りつつinterfaceも検索対象とするようにします。( 優先度は 基底クラスよりは上げておきます。)
実装
標準的なDataTemplateSelectorの動きをしつつ DataTypeに interface が指定されている場合にResourceの検索対処いうを拡張します。 下記にコードを示します。
   /// <summary>
    /// interface が アサイン可能なテンプレートを選びます。
    /// </summary>
    public class InterfaceTemplateSelector : DataTemplateSelector
    {
        private static DataTemplate NotFoundDataTemplate;

        private DataTemplate TryGetNotFoundDataTemplate()
        {
            if (NotFoundDataTemplate is null)
            {
                NotFoundDataTemplate = new DataTemplate();

                var visualTree = new FrameworkElementFactory(typeof(TextBlock));
                visualTree.SetBinding(TextBlock.TextProperty , new Binding());

                NotFoundDataTemplate.VisualTree = visualTree;
            }

            return NotFoundDataTemplate;
        }


        public override DataTemplate SelectTemplate(object item, DependencyObject container)
        {
            var c = (FrameworkElement) container;

            if(item is null)
                return TryGetNotFoundDataTemplate();

            var interfaces = item.GetType().GetInterfaces();

            // step 1 実タイプと一致するデータテンプレートを見つけた場合
            var type = item.GetType();
            {
                if (c.TryFindResource(new DataTemplateKey(type)) is DataTemplate template)
                {
                    return template;
                }
            }

            // step 2 インターフェースに一致するテンプレートを検索する
            foreach (var @interface in interfaces)
            {
                if (c.TryFindResource(new DataTemplateKey(@interface)) is DataTemplate template)
                {
                    return template;
                }
            }

            // step 3 基底タイプを検索し一致するテンプレートを検索する
            while (type.BaseType != null && type.BaseType != typeof(System.Object))
            {
                type = type.BaseType;
                if (c.TryFindResource(new DataTemplateKey(type)) is DataTemplate template)
                {
                    return template;
                }
            }

            return TryGetNotFoundDataTemplate();
        }
    }
MarkupExtensionを用意しておくとすっきり書けます。
    public class InterfaceTemplateSelectorExtension : System.Windows.Markup.MarkupExtension
    {
        public override object ProvideValue(IServiceProvider serviceProvider)
        {
            return new InterfaceTemplateSelector();
        }
    }
実際の使用例です。 インターフェース
    public interface IHoldClipDataContext
    {
        double StartValue { get; set; }
        double EndValue { get; set; }
    }

    public interface ITriggerClipDataContext
    {
        double Value { get; set; }
    }
ViewModel
    public class TriggerClipVm : Notification, ITriggerClipDataContext
    {
        public double Value { get; set; }
    }

    public class HoldClipVm : Notification, IHoldClipDataContext
    {
        public double StartValue { get; set; }
        public double EndValue { get; set; }
    }
xaml( 定義 )
    <DataTemplate DataType="{x:Type timelineControl:IHoldClipDataContext}">
        <timelineControl:HoldClip
            UseLayoutRounding="False"
            Scale="{Binding Scale , RelativeSource={RelativeSource AncestorType=timelineControl:TsTimeline}}"
            StartValue="{Binding StartValue}"
            EndValue="{Binding EndValue}"
            Width="{Binding CanvasActualWidth, RelativeSource={RelativeSource AncestorType=timelineControl:TsTimeline}}"
            Height="{Binding TrackHeight , RelativeSource={RelativeSource AncestorType=timelineControl:TsTimeline}}"
            Background="LightSlateGray" ClipToBounds="False" />
    </DataTemplate>

    <DataTemplate DataType="{x:Type timelineControl:ITriggerClipDataContext}">
        <timelineControl:TriggerClip
            UseLayoutRounding="False"
            Scale="{Binding Scale , RelativeSource={RelativeSource AncestorType=timelineControl:TsTimeline}}"
            Value="{Binding Value}"
            Width="{Binding CanvasActualWidth, RelativeSource={RelativeSource AncestorType=timelineControl:TsTimeline}}"
            Height="{Binding TrackHeight , RelativeSource={RelativeSource AncestorType=timelineControl:TsTimeline}}"
            ClipToBounds="False" />
    </DataTemplate>
xaml ( DataTempalteSelectorの指定 )
<ItemsControl ItemsSource="{Binding Clips}"
   ItemTemplateSelector="{timelineControl:InterfaceTemplateSelector}">
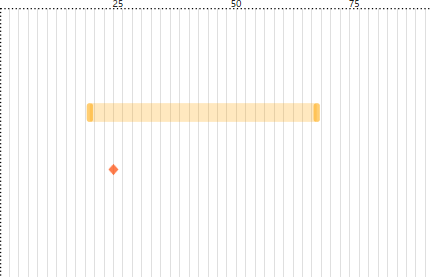
結果です。
TriggerClipは赤色、HoldClipはオレンジ色です。
interfaceによってViewが切り替わっているのが確認できました。
WPF TextBlock等で利用される規定のFontFamily
設定がない場合SystemFonts.MessageFontFamilyから取得したものを利用する
デフォルト(規定)のTypeFaceを作成するには
var typeface = new Typeface(SystemFonts.MessageFontFamily.Source);
もしくは
var typeface = new Typeface(SystemFonts.MessageFontFamily , FontStyles.Normal, FontWeights.Regular, FontStretches.Normal);
WPF DrawingContext.DrawText()で書いたテキストが滲む
WPF にはUseLayoutRoundingというプロパティがあり、ルート要素 (MainWindow等)で trueにすると文字や絵が滲まなくなることは有名だが DrawingContextを使って独自に文字列を描画している場合は滲んでしまう。
この対策としてルート要素に下記Propertyを指定しておけば文字が滲まなくなる。
    TextOptions.TextFormattingMode="Display"
    TextOptions.TextRenderingMode="ClearType"
微妙なのでわかりづらいのだが 「4」が露骨につぶれなくなっているのが分かる。

WPF DependencyProperty SetCurrentValue と SetValueの違い
今日は DependencyProperty.SetValue()とDependencyPropertySetCurrentValue()の違いについて具体例を出して挙動の違いを見ていこうと思います。
「ViewModelの値とViewの値が違うんです。」みたいな相談をたまに受けるんですが大体原因はこれです。
まずはDependencyProperyですが
        public static readonly DependencyProperty PropertyProperty = DependencyProperty.Register(
            "Property", typeof(string), typeof(MainWindow), new PropertyMetadata(default(string)));

        public string Property
        {
            get { return (string) GetValue(PropertyProperty); }
            set { SetValue(PropertyProperty, value); }
        }

        void Func()
       {
             Property = "hoge";
       }
てこんなやつですね。
'Property = "hoge" 'を呼びだすと内部のSetValue()からCLR層に設定しに行きます。 今回はこのSetValueが問題になるケースがあるのでこれを解説します。
とりあえずサンプルソースコードです。なるべくシンプルにしています。

MainWindow.xaml
<Window x:Class="Binding_Sample.MainWindow"
        xmlns="http://schemas.microsoft.com/winfx/2006/xaml/presentation"
        xmlns:x="http://schemas.microsoft.com/winfx/2006/xaml"
        xmlns:d="http://schemas.microsoft.com/expression/blend/2008"
        xmlns:mc="http://schemas.openxmlformats.org/markup-compatibility/2006"
        mc:Ignorable="d"
        Title="MainWindow" Height="350" Width="525">
    <StackPanel>

        <TextBlock Text="View Value = "/>
        <TextBlock x:Name="block1" Text="{Binding Text}" Margin="0,0,0,20"/>

        <TextBlock Text="ViewModel Value = "/>
        <TextBlock Text="{Binding Text}" Margin="0,0,0,20"/>

        <Button x:Name="button1" Content="ビューの値変更"/>

        <Separator/>

        <TextBlock Text="View Value = " FontSize="20"/>
        <TextBlock x:Name="block2" Text="{Binding Text2}" Margin="0,0,0,20"/>

        <TextBlock Text="ViewModel Value = " FontSize="20"/>
        <TextBlock Text="{Binding Text2}" Margin="0,0,0,20"/>

        <Button x:Name="button2" Content="ビューの値変更"/>
    </StackPanel>
</Window>
MainWindow.xaml.cs
using System.ComponentModel;
using System.Runtime.CompilerServices;
using System.Threading.Tasks;
using System.Windows.Controls;

namespace Binding_Sample
{
   // VIewModelです。
    public class Context : INotifyPropertyChanged
    {
        private string _text = "ビューモデルから設定";

        public string Text
        {
            get => _text;
            set => SetProperty(ref _text, value);
        }

        private string _text2 = "ビューモデルから設定";

        public string Text2
        {
            get => _text2;
            set => SetProperty(ref _text2, value);
        }

        private void SetProperty<T>(ref T source, T value, [CallerMemberName] string propertyName = null)
        {
            source = value;
            RaisePropertyChanged(propertyName);
        }
        public event PropertyChangedEventHandler PropertyChanged;

        private void RaisePropertyChanged([CallerMemberName] string propertyName = null)
        {
            PropertyChanged?.Invoke(this, new PropertyChangedEventArgs(propertyName));
        }
    }

    public partial class MainWindow
    {
        public MainWindow()
        {
            var context = new Context();
            DataContext = context;

            InitializeComponent();

            // ボタンのコードビハインドです。
            button1.Click += async (s, e) =>
            {
               // 値を設定し
                block1.Text = "ビューから設定";

               // 500ms 待ちます。
                await Task.Delay(500);

               // ViewModelから値を再設定します。
                context.Text = "ビューモデルから設定";
            };

            button2.Click += async (s, e) =>
            {
               // 値を設定し
                block2.SetCurrentValue(TextBlock.TextProperty,"ビューから設定");

               // 500ms 待ちます。
                await Task.Delay(500);

               // ViewModelから値を再設定します。
                context.Text2 = "ビューモデルから設定";
            };
        }
    }
}
このソースコードはそれぞれボタンをクリックしたら、TextBlockのTextプロパティを更新しその後500ミリ秒後にViewModelから値を再設定し更新通知を飛ばすプログラムです。 両者の違いは上は SetValue 下は、SetCurrentValueを利用していることです。
実際に動かしてみると以下の様になります。
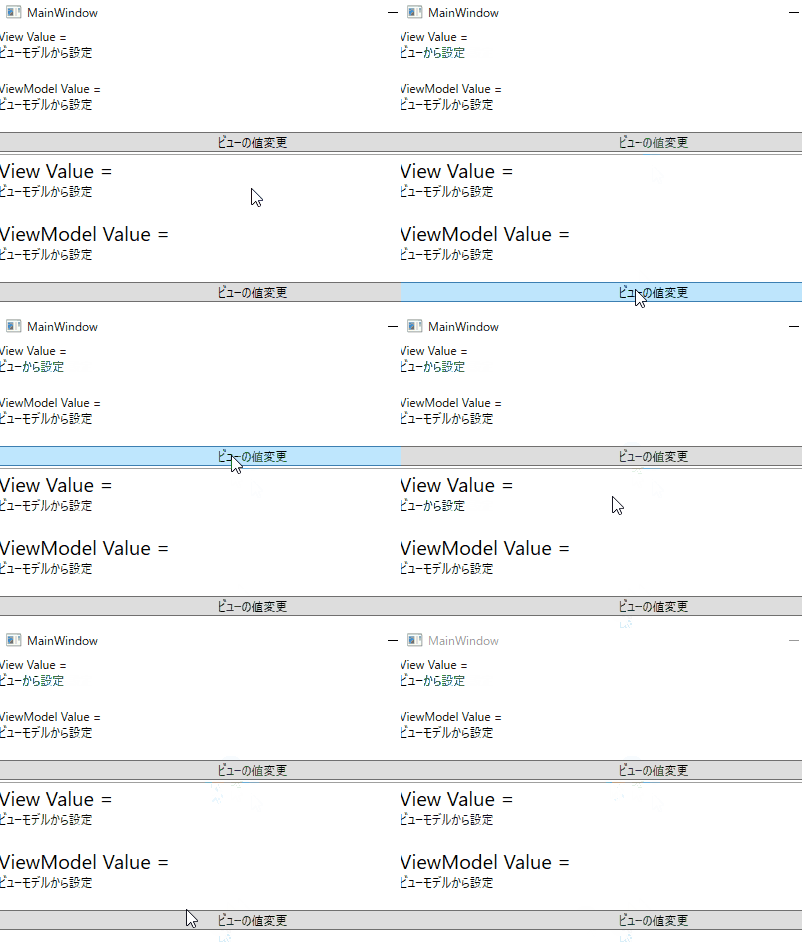
上のボタンは1回だけ反応してその後は動いていません。 下のボタンは押すたびにビュー→ビューモデルと値が更新されているのがわかります。
何が起こっているのかというと、SetCurrentValueを使わない場合はSetValueのタイミングでOneWayでBindされていたBindingObjectを上書きしてしまっており、以降ViewModelからの更新通知が飛んできても反映されなくなります。
SetCurrentValueを利用する場合は画面の値を更新しますが、BIndingやDataTrigger等を破壊しないので再度BInd元から更新通知が飛んでくれば元に戻るわけです。
更にややこしいことにTwoWayバインドだとSetValueでも問題無いのです。Bindigを破壊せずソース側( ViewModel)に値がちゃんと飛んできます。
まぁ、独自コントロールを作るときにしかハマらないとは思うのですが覚えておくと困ったときに役立つかもしれません。
JavaScript Electron導入
Electron とは
マルチプラットフォームの実行Framework
java script , html 5でアプリケーションが作成できる
開発に必要なもの
VisualStudio Code ( あると便利 )
- 余談ですが VSCodeは Electron製です。
VSCodeを使ったHello World
- エクスプローラーから空のフォルダを作成

- VSCodeで作成したフォルダを開く
- ターミナルを表示

- Node.jsの環境構築
ターミナルで下記コマンドを実行
npm init -y
※Node.jsをインストールしたばかりで動作しない場合はPCを再起動してみてください。
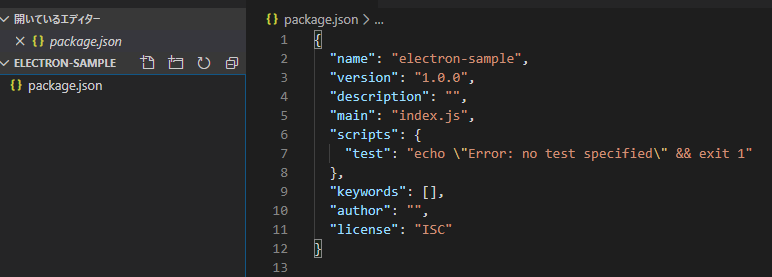
成功すると package.jsonが作成されます。
- electron のインストール
ターミナルから下記コマンドを実行
npm install -d electron
成功するとnode_modules と package-lock.jsonが作成される。

- srcディレクトリを作成し、下記ファイルを配置
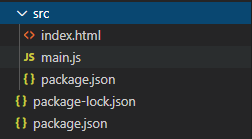
index.html
<html>
    <head>
        <meta charset="UTF-8">
        <title>Hello World!</title>
    </head>

    <body>
        <h1>こんにちは!Electron</h1>
    </body>
</html>
main.js
// Electronのモジュールを読み込み
var {app, BrowserWindow} = require('electron');

function createWindow() {
  // メインウィンドウを作成
  var mainWindow = new BrowserWindow({
    webPreferences: {
      nodeIntegration: true,
    },
    width: 400, height: 300,
  });

  mainWindow.loadFile('index.html');
}

//  ウィンドウ表示
app.on('ready', createWindow);
package.json
{
    "main": "main.js"
}
- 実行
ターミナルからnpx electron ./srcを実行
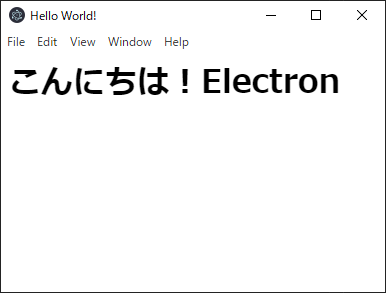
Electronでウィンドウを表示することができました。
